

Introduction
If you’re using propery controls, it will sometimes make sense to limit the values that are displayed in each property control. Some examples include hierarchies like:
- Product Category – Subcategory
- US States – Cities
- …
With hierarchies like these, the amount of values are either too big or only make sense for specific members within the hierarchy.
The easiest way to do this is through the use of:
- Document Properties
- Calculated Columns
- An IronPython script
Implementation
Let’s go through the steps using the first example:
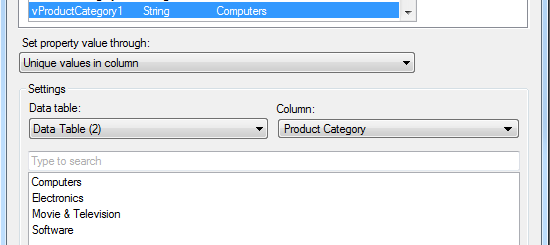
- Create a property control for the highest member of the hierarchy. This can be any type of property control. In our case, let’s use a drop-down list for Product Category as an example. We’ll take the unique list of values directly from our data table.
NOTE: we will only have two levels in our hierarchy but there can be more than two, the logic stays the same.
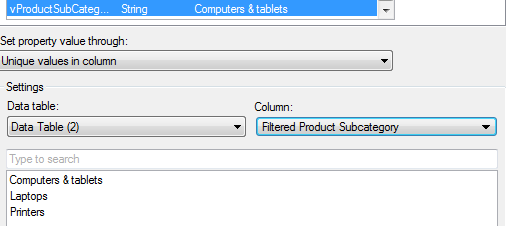
- Create a new calculated column for the same data table where the highest member of the hierarchy (Product Category) is part of.
If([Product Category]="${vProductCategory1}",[Product Subcategory],null)* If you want to use a multi (select/input) property control you will need to change the calculated column to use the following calculation (in our example the use of a multi property control might not be that useful):
If([Product Category] in ($map("'${vCategoryMultiple}'",",")),[Product Subcategory],null)(vCategoryMulti is a multi select list box property control)
- Create a property control for the second level member of the hierarchy. This time we’ll use the unique list of values from the calculated column (in our case “Filtered Product Subcategory”).
At this point your text are with the property controls will look something like this:

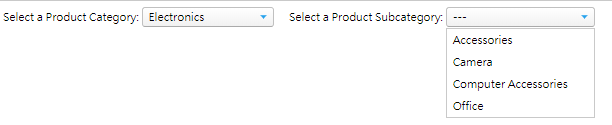
You’ll notice, once you start changing your first level member the correct (limited) list of values is displayed in the second drop down. However, the default value will display “—“.
This happens when the last selected value in your second drop down (e.g. Computers & Tablets) doesn’t exist in the new first level member (after changing from Computers to Electronics).
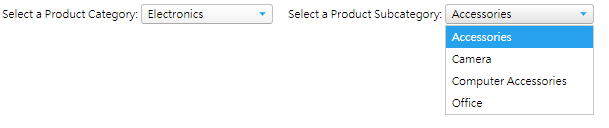
Ideally, you would want to have it look like this:
To solve this, we’ll add another calculated column and add a script to our first drop down:

- Create a new calculated column to calculate the first value for our second dropdown (“Filtered Product Subcategory”). We’ll call this column “First”.
First([Filtered Product Subcategory])- Add the following script to your first dropdown:
Document.Properties["vProductSubCategory1"] = Document.Data.Tables["Data Table (2)"].Columns["First"].RowValues.GetFormattedValue(1)NOTE: The first function in the calculated has the following definition:
Returns the first valid value based on the physical order of the rows of data in the argument column.
It will not follow any custom sort order you would have specified for the column. When your datasource is not sorting the categories in the correct order, you might need to apply more scripting or add a few calculated columns which we will discuss in a future blog post:
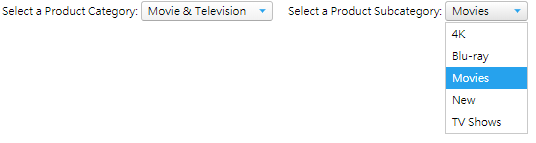
In our example “Movies” comes back as the first value even though the custom sort order displays “4K’ first.